How to add signature to your Gmail?

Adding a signature to Gmail (infact any email service) is always handy and helpful. Many of us consider adding  "a signature to email" a time consuming activity and tend to get lazy and never do it. 
But yes, after writing every email we are ready to take the pain to write Thanks, Regards etc. I personally find it the most annoying thing in the email writing part. 

Writing Thanks and my name each time when i have to send an email. Itsn't that crazy? 

On one fine day I took 5 minutes out of my schedule and did add a signature to my Gmail to save time and effort.
In the signature you can add your name, web site link, phone number, company name etc. You can even add a thought or a quote too. An email signature not only saves time but can be a marketing tool as well for your company, business or website. 
Also, you will never miss sharing important contact numbers or address as you just have to add these one time while adding a signature. 
So, let's do it NOW.
To add signature in Gmail:
1. Open your Gmail. 
2. Click on the  gear in the top right and go to "Settings" tab.


3. Now, scroll down to the “Signature” section and enter your desired text in the box. You can format your text using the buttons directly above the text box. 
Also you can add image and can link the text to the desired website.

4. Click "save changes" and we are done!!! 

How much time it took? Just 5-7 minutes ONLY.


Share this and like us on Facebook 
It only takes few seconds!



How to keep your laptop SAFE? - few TIPS


Day before yesterday, I was enjoying a cup of coffee while working on my laptop. A slight fumble and my laptop was in a mess with the coffee all over it. 


I immediately upturned the laptop, wiped it and checked whether all keys were working fine, they were. I got engaged again in completing my work.


After few minutes I thought of calling my 'Computer engineer' friend (I don't know how it struck me). I told him the matter and he immediately asked me to bring the machine to him. 


After inspecting the laptop, he disassembled the laptop cleaned it and assembled it again. He shared few very important tips to keep our machines safe. Here are the tips:


1.  NEVER, use/open a liquid container near your laptop.
2.  NEVER, turn on your laptop immediately when moving from extreme cold to warm atmosphere and vice-versa. Let the laptop acclimatize to the surrounding temperature before booting it.
3.  NEVER, use a laptop if you spilt liquid on it or it got wet. It may get boot for the time being but the water/moisture entered the machine can cause corrosion and rusting which will show its effects in few months. So, its recommended that you immediately bring it to the service centre so that they can clean it from inside as well. 
4.  NEVER, connect the charger to power plug first. While charging a laptop always insert the power point to the laptop first and than connect to the power plug.
5.  NEVER miss on a routine preventive service of your laptop. It may look perfectly fine from outside but it may be prone to major problems.
6.  NEVER use a laptop on a cushioned surfaces like pillow, mattress or your lap for that matter. The machine needs proper ventilation while running. Always use the laptop on hard surface like table, hard book cover, piece of wood etc.
7.  NEVER leave your laptop on a bed, sofa, pillow etc. while charging. It can cause sever accidents. (an article about it - Laptops on Beds Can Lead to Fires, Safety Officials Warn)
8.  NEVER leave a disc inside the drive. It's a belief that leaving a CD/DVD inside the drive protects the laser lens. Well, as the laptop is a mobile device keeping the disc can damage the laser lens and also the disc can get stuck inside the drive (when the laptop is carried from one pace to another) causing further problems.
9.  NEVER try to repair the laptop yourself if you are not a pro. Under no circumstances you should do this. 
10. NEVER use non-company accessories on your laptop, the charger in particular. Using a non-company charger can cause heating of the batteries which can lead to fire or explosion in the laptop batteries.

You may or may not know these tips but whatever is the case these are worth knowing and sharing.

Keep Learning-Keep Sharing

Now Secure your iPhone using your fingerprints

Apple’s new iPhone 5S fingerprint sensor

Apple has introduced its latest iPhone called the iPhone 5s where s stands for sensor and is similar to iPhone5 in design and dimensions with a faster processor, an improved camera and completely new feature called Touch ID: a sensor that scans user’s finger and verifies the identity to lock or unlock the phone.

About Touch ID

This fingerprint sensor, developed by AuthenTec (a Florida based company acquired by Apple last year) is a thin circle around the device’s existing home button which scans and verifies user’s fingerprint and then locks or unlocks the phone. The sensor and its security technology were the major reason why Apple acquired AuthenTec for $356 million. 

According to Apple, users will be able to scan up to 5 individual fingers to authorize access on iPhone 5s. To set up the system users have to repeatedly press their finger against the sensor from different angles, allowing the system to accurately get a three-dimensional scan of the surface of their finger. 
You can also purchase music and apps on Apple’s iTunes with Touch ID.

"Your fingerprint is one of the best passwords in the world," said Dan Riccio, Apple's senior vice president for hardware design. "It's always with you, and no two are exactly alike." According to Riccio, fingerprints are encrypted and are stored on the phone itself and not in the cloud or Apple’s servers. The encrypted fingerprint data is stored on iPhone 5s A7 system on a chip. The data is discarded if device is rebooted or has been left unused for more than 48 hours, at this point users will have to simply re-enter their passcode.


Working late night on PC? - Must read this !!


Headache, pain in the eyes, dizziness, sleepless nights? YES? than I am sure you work for hours on your PC or laptop, particularly late in the night. We may not know this but the Blueish light of the Computer and laptop has some real BAD affects on your health. For more read here - It’s Late, Turn Off That Computer!

If possible we should avoid burning our midnight oil but in these competitive era, its next to impossible for most of the people. I personally work for hours and hours on my laptop. But recently I have found a solution which will minimize the affects of the blueish screen on your health - Its f.lux.

What is f.lux?
f.lux is application/software which makes the color of your computer's display adapt to the time of day, warm at night and like sunlight during the day. Its just amazingly effective. You will immediately feel the minimum stress on your eyes, particular;y in the night.


Final word! - f.lux is a must have application if you work for hours on our PC/laptop or even mobile and tablets for that matter.


How to make consistent our MS Word document in terms of regular word space, font type, font size and line space etc.?

Oh, your MS Word document ("document") is also inconsistent in terms  of spacing between words, font type, font size and line spacing. 

Do not worry, now!!! 

As today, we will learn how to improve the quality of our document OR how to make consistent our document in terms of spacing between words, font type, font size and line spacing. These few important and quality steps are really very important for especially authors, content creators and copy editors etc...

By following the steps below, we can make our document consistent. 


A. To make the consistent regular space between words and line space in document, need to follow the steps below:   


        Regular Space between Words:

    1. First of all, we have to select the whole document (Ctrl+A) and the need to find the double spaces (double space bar) and replace with single space (single space bar). 

           2. We have to repeat the Step 1 till we get the message "0                                   replacements were made".


          3. Finally, we will have single word space throughout the document.


           Line Space:


    1. First of all, we have to select the whole document (Ctrl+A) and the need to find the ^p and replace with ^p^p.


         2. Then, we need to find ^p^p^p and replace with ^p^p throughout                  the document.


         3. We have to repeat the Step 2 till we get the message either "1                        replacement was made" or  "0 replacements were made".


Now, we will have consistent single line spacing throughout the document.


B. To change the font as required in MS Word, need to follow the steps below:

1.   First of all, create a new document that is based on the Normal template. To create a New Document, click File, click New, click Blank Document, and then click Create.


2.   In the Font group, click the Font type and size as per choice.


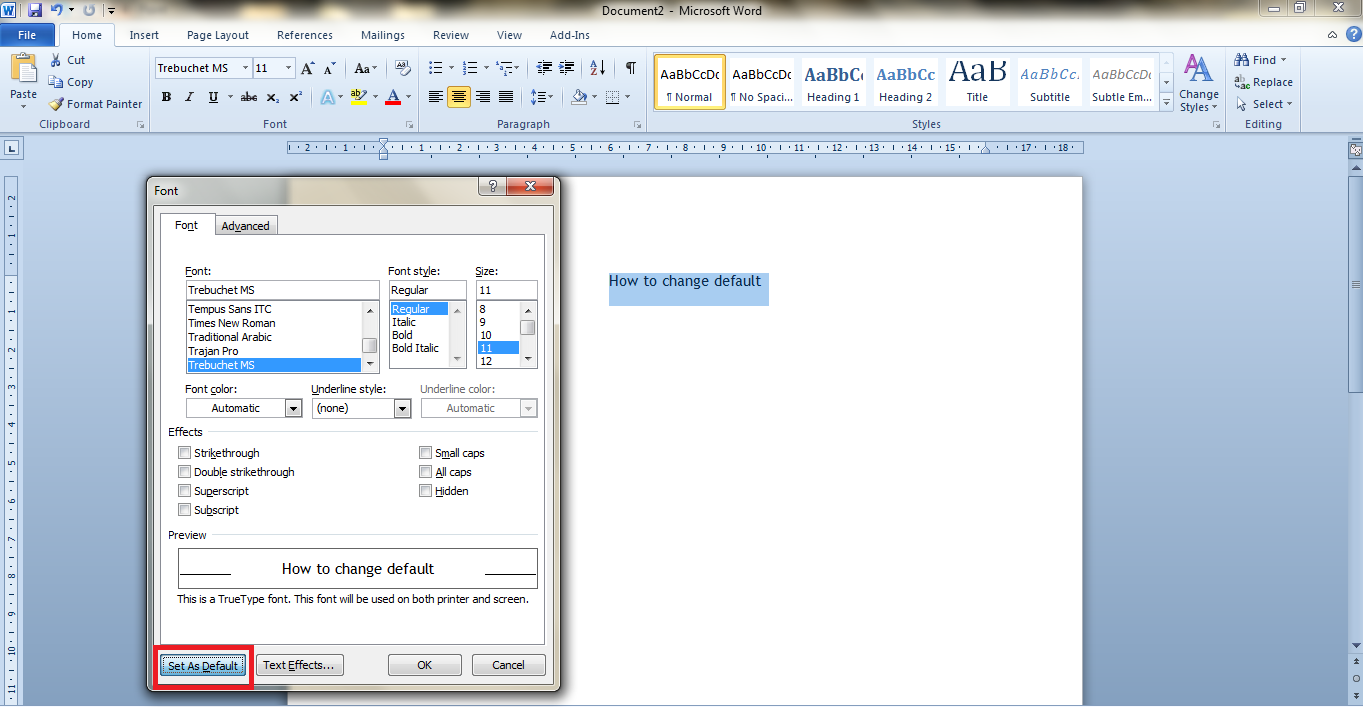
3.   Select the options that you want to apply to the default font, such as font type and font size. If you selected specific text, the properties of the selected text are set in the dialog box.


4.  Click Set As Default.

5.  Click Yes when you receive the following message:

    Do you want to change the default font to "font name"?

    This change will affect all new documents based on the NORMAL template.


6.   Click OK.


Now, font type and size are also will be consistent in our document.


To know more about other important steps regarding the MS Words, please visit our posts on regular basis.


YES! 
Your valuable feedback is also really very important for us to give our BEST to you. 


A sweet treat from Android - KitKat!!!


So here comes a new sweet treat from Android…. Android KitKat, yes the brand KitKat

KitKat statue installed at Google headquarters
Google recently announced new version of its mobile operating system Android 4.4 as KitKat which is named after Nestle’s popular candy bar, trademarked and licensed by Hershey in US. The deal doesn’t involve either side to pay the other; instead the idea was to do some fun and something unexpected.
It was previously indicated that the next version of Android would be a ‘K’ letter Key Lime Pie, but the idea was dropped as a very few people know the taste of a Key Lime Pie. Now to promote this alliance Nestle plans to sell more than 50 million chocolate bars featuring Android mascot to shops in 19 markets which includes UK, US, Brazil, India, Japan and Russia.
For promotion and to make the treat even sweeter, KitKat is giving a chance to win a Nexus 7 or Google Play credit, just look for this specially branded KitKat candy bars featuring the Android robot in a store near you.


The earlier Android versions released on desserts’ name include Android 1.5 Cupcake, Android 1.6 Donut, Android 2.0 Éclair, Android 2.2 Froyo (Frozen Yogurt), Android 2.3 Gingerbread, Android 3.0 Honeycomb, Android 4.0  Ice Cream Sandwich, Android 4.1 Jelly Bean


How to use "RARELY KNOWN" features of Google Chrome Browser

Using your favorite Google Chrome web browser? So, let’s make it a bit more interesting and have a look at some of the unique features that are available only in this Google’s web browser and are often overlooked.

  • Viewing Browser History

To open browser history just click on Chrome menu on browser toolbar and select History. Use this History page to see a list of websites you have ever visited in last 10 weeks. The pages visited in incognito mode, pages from secure website or deleted browsing history are not stored in history page.


  • Paste and Go / Paste and Search

If have a URL in your clipboard and intend to visit that site on Chrome, then instead of doing Ctrl+v you can just right-click and click Paste and go to automatically visit that site.
Same for text i.e. if you have anything other than URL in your clipboard and you want to search using Chrome’s address bar, then just right-click and click Paste and Search. This saves the step to paste and then hit Enter.

  •          Check Memory Used by Different Browsers

If you want to see detailed statistics of your browser’s open processes, i.e. how memory is being consumed by different processes in the browser, then use about:memory feature of Chrome. This interface can be accessed by entering about:memory in Chrome’s address bar.


  •           Switch to iPad Interface

You can see how your favorite site will look in an iPad by changing the user agent string of your browser to that of iPad. To change user string in Chrome follow below steps:

  •           Right-click Chrome shortcut icon and select Properties,
  •      Now go to shortcut tab
  •      In Target field replace the entire text with the following text: "C:\Users\username\AppData\Local\Google\Chrome\Application\chrome.exe -user-agent=”Mozilla/5.0(iPad; U; CPU iPhone OS 3_2 like Mac OS X; en-us) AppleWebKit/531.21.10 (KHTML, like Gecko) Version/4.0.4 Mobile/7B314 Safari/531.21.10"
              (Note: username represents your windows username)
  •      Now Press OK.
  •      Now open Chrome browser and open sites that have released their iPad version and see how the site will look in iPad.


  •                 Application Shortcuts

Chrome gives you the feature to create standalone apps from your favorite websites and place them on the desktop, start menu or the task bar. These webpages are opened in standalone windows without any menus, tabs or other standard browser components.
Just click on Tools  and then click Create application shortcuts, shortcut will be created based on the options selected.