Showing posts with label Softwares. Show all posts

Working late night on PC? - Must read this !!


Headache, pain in the eyes, dizziness, sleepless nights? YES? than I am sure you work for hours on your PC or laptop, particularly late in the night. We may not know this but the Blueish light of the Computer and laptop has some real BAD affects on your health. For more read here - It’s Late, Turn Off That Computer!

If possible we should avoid burning our midnight oil but in these competitive era, its next to impossible for most of the people. I personally work for hours and hours on my laptop. But recently I have found a solution which will minimize the affects of the blueish screen on your health - Its f.lux.

What is f.lux?
f.lux is application/software which makes the color of your computer's display adapt to the time of day, warm at night and like sunlight during the day. Its just amazingly effective. You will immediately feel the minimum stress on your eyes, particular;y in the night.


Final word! - f.lux is a must have application if you work for hours on our PC/laptop or even mobile and tablets for that matter.


How to make consistent our MS Word document in terms of regular word space, font type, font size and line space etc.?

Oh, your MS Word document ("document") is also inconsistent in terms  of spacing between words, font type, font size and line spacing. 

Do not worry, now!!! 

As today, we will learn how to improve the quality of our document OR how to make consistent our document in terms of spacing between words, font type, font size and line spacing. These few important and quality steps are really very important for especially authors, content creators and copy editors etc...

By following the steps below, we can make our document consistent. 


A. To make the consistent regular space between words and line space in document, need to follow the steps below:   


        Regular Space between Words:

    1. First of all, we have to select the whole document (Ctrl+A) and the need to find the double spaces (double space bar) and replace with single space (single space bar). 

           2. We have to repeat the Step 1 till we get the message "0                                   replacements were made".


          3. Finally, we will have single word space throughout the document.


           Line Space:


    1. First of all, we have to select the whole document (Ctrl+A) and the need to find the ^p and replace with ^p^p.


         2. Then, we need to find ^p^p^p and replace with ^p^p throughout                  the document.


         3. We have to repeat the Step 2 till we get the message either "1                        replacement was made" or  "0 replacements were made".


Now, we will have consistent single line spacing throughout the document.


B. To change the font as required in MS Word, need to follow the steps below:

1.   First of all, create a new document that is based on the Normal template. To create a New Document, click File, click New, click Blank Document, and then click Create.


2.   In the Font group, click the Font type and size as per choice.


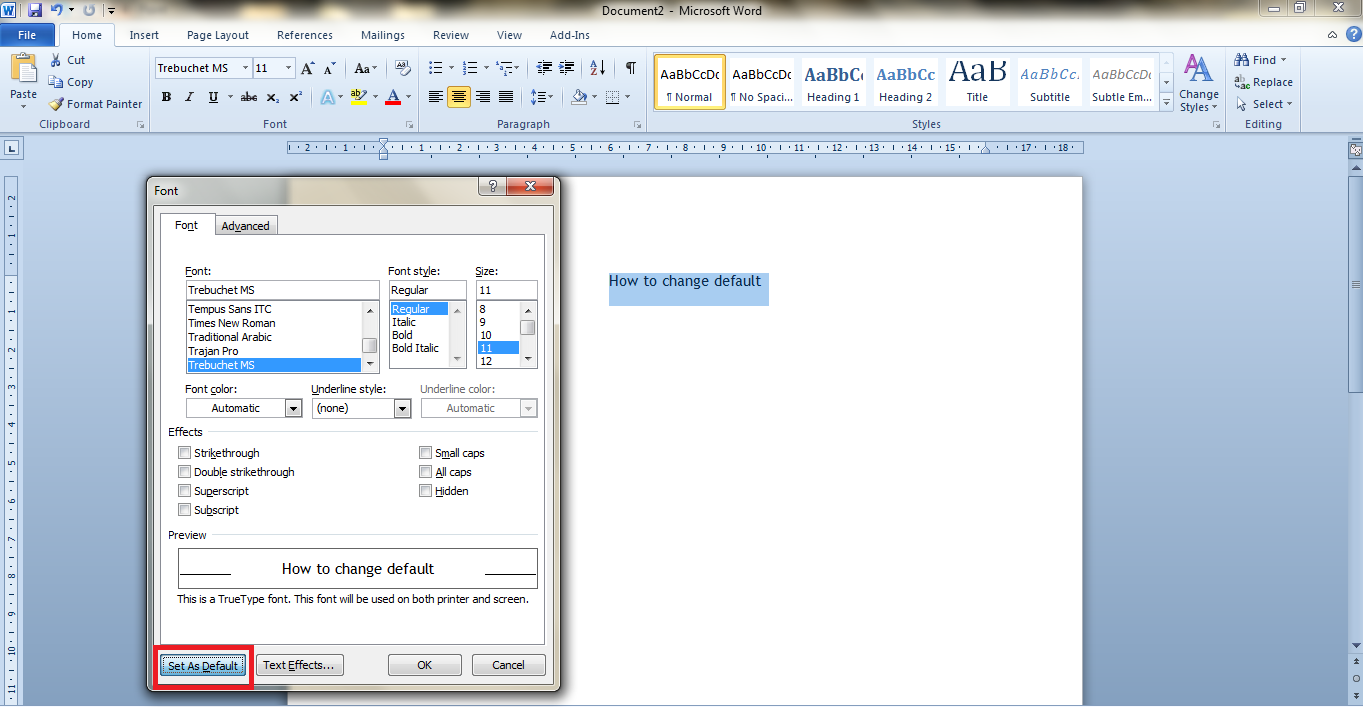
3.   Select the options that you want to apply to the default font, such as font type and font size. If you selected specific text, the properties of the selected text are set in the dialog box.


4.  Click Set As Default.

5.  Click Yes when you receive the following message:

    Do you want to change the default font to "font name"?

    This change will affect all new documents based on the NORMAL template.


6.   Click OK.


Now, font type and size are also will be consistent in our document.


To know more about other important steps regarding the MS Words, please visit our posts on regular basis.


YES! 
Your valuable feedback is also really very important for us to give our BEST to you


How to update and break the link of cross-references in MS Word?

Today, we will learn to update and break the link of cross-references in Microsoft Word through a step-by-step guide. This free MS Word tutorial is broken into two main parts - Updating the Cross-reference and  Breaking the Link of Cross-references. 

So, let's move the the tutorial now -


1. Update the Cross-reference:

Step (i)  First of all, open the MS Word document we wish to work upon. 


Step (ii)  Then, select the entire text of the document using "Ctrl+A".


Step (iii)  Now, press key "F9" and this will update all cross-references automatically.


2. Break the Link of Cross-references:

Step (i)  First of all, open the MS Word document we wish to work upon. 


Step (ii)  Then, select the entire text of the document using "Ctrl+A".


Step (iii)  Press key "F9", which will update all cross-references automatically.

Step (iv)  At last, press "Ctrl+Shift+F9" and this step will break the links of all cross-references.


We are done!!!

Hope you liked the this tutorial. Please visit us again for more free guides.


Recommended for you - 


How to track changes in Microsoft Word 2010?
How to change the default font in MS Word 2010 according to our choice?

How to change the default font in MS Word 2010 according to our choice?

To change the default font in MS Word 2010, we need to follow the steps below:

1.  First of all, create a New Document that is based on the Normal template. To create a new document -- click File, click New, click Blank Document, and then click Create.


2.  In the Font group, click the Font as per choice.


3.  Select the options that you want to apply to the default font, such as font style and font size. If you selected specific text, the properties of the selected text are set in the dialog box.


4.  Click Set As Default.


5.  Click Yes when you receive the following message:

"Do you want to change the default font to font name?"

This change will affect all new documents based on the NORMAL template.


6.       Click OK.

   Now, we can draft our document(s) in our Favourite Font.


How to Convert and Resize Videos Using VLC Player

Yes you heard it right! apart from playing videos (virtually of any format) on the VLC player and listening favorite music on it, one thing more we can do - convert and resize videos. That another very cool, but very unknown, feature of VLC player. Here is a tutorial for converting and resizing videos for free. So lets straight away go to the step-by-step tutorial.


STEP 1: Open VLC Media Player

STEP 2: Click "Media" and then select "stream"


STEP 3: In the pop-up window, click "Add" to select the file from your computer, which you want to convert or resize.


STEP 4: Click on "stream" and choose "stream" again from the drop down menu.


STEP 5: Click on next

STEP 6: In the next window just click "Next" again. 


STEP 7: Now from profile drop down menu, choose the videos format to which you need to convert your selected file.


STEP 8: In STEP 7, click on setting icon and select the appropriate Video and audio codec options. Keep an eye on the comments as most of the time the video and audio codec don't match . Also please note the encapsulation method suggested for e.g. "MPEG PS" . Your both the video and audio codec should support a common encapsulation method . for perfect Audio-Video combination.


STEP 9: In the next screen, choose the option. "stream all the elementary streams" and then click "stream"


STEP 10: The VLC player will play a mute audio file . No issues here, VLC player is progressing the request.

And thats it! we are done!!

If you have found this guide helpful, please share this on Facebook

How to take backup of your computer?

Unfortunate and unlikely things happen in this world and you never know when they are going to happen. A computer hard disk failure is also one of those unfortunate things which can happen at any moment. These days our important documents, pictures, audios and videos, almost everything are stored in our PCs and Laptops.  At times due to hard disk failure we lose very important data and which cannot be recovered. But Microsoft has done one very fortunate thing in Windows 7 by creating built-in backup feature. We just have to follow few steps to take the backup of our computer. The below step-by-step tutorial will guide you to take the data backup of your computer.

STEP 1: Click on the Start menu and go to Control Panel


STEP 2: Under the heading "System and Security", click on "Back up your computer"

STEP 3: Inside "Backup and Restore Control Panel" there are many options.  Click on "Set up backup", as we are going to take backup of our computer.

STEP 4: Windows will now set-up your backup software


STEP 5: Now, select a data storage destination where your backup will be stored. In this step all the locations where the backup data can be stored will be listed (including your DVD drive, external storage devices like external hard disk, pen drive etc.) We are using D: drive to store the backup so we have chosen D: drive. Once the destination is selected, click "Next".


STEP 6: In this step, either select the files manually or let the Windows select the most common files. Here, it also creates a backup schedule.
.

STEP 7: Click "Save settings" & then "backup now" to finish the process.


STEP 8: The data backup is in process now. No matter data lose !

Hope you liked this tutorial for backup of your computer data.


------------
Suggested Topics